Yawn, what's this then, yet another newcomer to the Z-Wave market promising to deliver a perfect out-of-the-box Home Automation experience?
Regular readers of our Blog will understand our scepticism - we test these sorts of products all the time and nearly always end up disappointed with the end results.
Previously there's always something that's wrong, for example device compatibility might be great, but perhaps the underlying web UI is poor. Or the web UI is fantastic, really user friendly, but the controller only works with a handful of devices.
Read on for our thoughts on the new devolo Home Control Z-Wave controller and devices and find out why we think that devolo have come up trumps and that their entry into the Home Automation market will be a success!
devolo who?
You may have seen devolo products in your local computer store over the years - they've been at the forefront of both home and business networking technologies since 2002.
Most widely recognised for developing innovative "Powerline" network products that use your existing AC mains wiring to extend your wired Ethernet network, they're now bringing their expertise to your Smart Home too.
It's a brave move and one that other manufacturers are also making. As Home Automation technologies gain traction and become more mainstream, it's important for big companies like this to bring their established brands to compete in the Z-Wave world. The more players that enter the market the more competition there is and this hopefully leads to better devices and systems for us, the paying customers.
Unboxing
We can't resist a go od unboxing session and devolo didn't disappoint in this respect, largely due to the quantity of boxes of toys that they had actually sent us. Take note other manufacturers - if you want us to review your system, try sending us the whole kit and caboodle and not just a few isolated devices that can't be used together!
So a good start from devolo, they actually sent us ALL the devices in the range to play with and unpacking them was a joy. Great packaging with informative details on what each device could do and how it can be used within the wider system. Checkout our devolo Vine videos to see what we mean.
Factor in clear and concise manuals along with appropriate accessories for each device (for example batteries and fixings) and there's nothing here to get vexed about. It's certainly a refreshing change to not have to root around robbing batteries out of the TV remote or to have to download manuals off the Internet.
And yes, we know having a "digital" manual saves paper, but really there's nothing quite like having a manual in your hands to read and most of the time when we download a PDF we end up printing it out anyway! The devolo manuals are well worth a read through before starting - typically something that most of us never do - but in this case there's a lot of useful stuff mentioned that will be of definite help to those new to Z-Wave or Home Automation in general. Again, a nice touch and reinforces the fact that devolo are doing a good job focusing on user friendliness.
Initial Impressions and Controller set-up
The keen eyed amongst you will no doubt notice that the devolo devices look familiar and that's because these are all devices that use the same base hardware that can be found re-badged from manufacturers like Danfoss, POPP, TKB, Philio and Z-Wave.me.
This is a common approach being used more often nowadays as it allows the manufacturer to use existing devices but loaded with their own firmware. It's a quicker route to market rather than developing hardware from scratch.
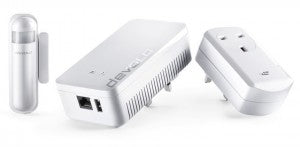
Turning our attention to the devolo "Home Control Central Unit" (HCCU) - a Z-Wave Plus Primary Controller - and it's clear that this isn't a third-party device. The HCCU is available as part of the devolo Home Control Starter Pack which also includes a power metering socket and a door / window contact sensor. Being Z-Wave Plus it will work with the latest generation of "Gen 5" Z-Wave devices but will also be backwards compatible with older versions. Indeed devolo's own devices are a mixture of Z-Wave and Z-Wave Plus.
The HCCU is an interesting design, being a plug-in unit with an Ethernet connection and is pretty chunky, so will likely block one or more sockets when plugged in to an extension lead or double socket.
Initially we were a bit confused as to this form factor choice because we envisioned that the typical location of a socket (just above skirting level, behind curtains, cupboards, etc) wouldn't really be conducive to having good Z-Wave RF reception and transmission. Most other hub designs use a wall plug PSU and have a couple of metres of low-voltage cable to allow decent citing of the controller itself away from the socket.
Flicking through the manual though and it soon becomes clear why devolo have chosen this design for their controller - you can integrate it directly into an existing dLAN network! That's right, if you already make use of devolo dLAN network extenders, you can simply plug the devolo controller into any electric socket and add it to the network. So you don't even need an Ethernet connection. This is a really cool idea as it means you can now cite the controller in a more central location in your home and not be tied to needing a physical connection to your Internet router. Of course if you don't use devolo dLAN devices already then you can simply opt for the direct Ethernet connection instead. Or maybe take the opportunity to checkout the dLAN devices as well :-)
For testing purposes we chose to locate the devolo HCCU downstairs in the kitchen as it's a reasonably central location and the socket is at counter height so is in "free air". Fortunately we have CAT5e cabling to every room so a couple of patch cables later and the HCCU had a direct Ethernet connection. We powered it on and watched the LEDs flashing red as it went through it's boot process, taking a few minutes or so to start up and eventually showing a solid white LED.
Back upstairs in our office and we located the HCCU IP address from our Internet router and had a quick probe to see if there was any local web UI or suchlike. Nothing as far as we could see, which confirmed our feeling that the devolo system was likely to be a Cloud based UI. We headed over to mydevolo.com in our web browser and registered for an account.
After confirming the account via registration email we could log in to the devolo Cloud portal and take a look around. Since devolo offer various other products there are links to their "LiveCam" device portal as well as one for "Home Control". We clicked on the latter and were presented with a screen with a single icon in the centre called "Demo-Haus" - perhaps this got missed in the German -> English translation - and underneath this "plus", "delete" and "edit" icons.
Nothing really sprang out as to what to do next, and the "Demo-Haus" icon was intriguing so we chose the blue pill and clicked the link :-)
Well, what a pleasant surprise - a completely functional demo of the devolo HCCU web UI!

We explored it in depth for quite some time, it's a fantastic feature and the first time we've seen something like this from any Z-Wave controller manufacturer. Obviously it's not actually controlling physical devices, but at least you can get a look around the UI and see what functionality is available "try before you buy" style.
We've since discovered that you don't even need to register for an account to try the demo system - just click here.
After we'd finished playing around for half an hour or so, we went back to the initial screen and this time clicked on the "plus" icon - this seemed to be the most logical course to take to add our own HCCU. We had to enter our home address and a few other details and then it automatically detected the HCCU (we assume that you need to be on the same network for this to work). If the automatic detection doesn't work then you can enter the serial number which is on the back of the device AND on the sticker on the instruction manual cover - a nice touch as it saves the annoyance of having to unplug the device to get the serial number :-)
We then had to press the button on the front of the HCCU to confirm the process - this was a bit annoying as we had to run downstairs to do this and by the time we got back the process had timed out! So we had to do it again, but this time switched to a laptop temporarily so we could be right next to the HCCU.
A minute or so later and the HCCU was added and we were told that a firmware update was required and was being automatically installed. We let it do it's thing and went and made a coffee - hopefully future firmware updates won't be completely automatic like this, instead the user being prompted to install them at a more convenient time.
Once the firmware update was complete and the HCCU was up and running again we took a quick look at the devolo Home Control App on our iOS and Android smartphones. This was a little bit disappointing as it seems it's just a wrapper around a mobile-optimised version of the full web UI. We've seen this quite a lot recently and while we can understand that it's a quicker way of covering multiple platforms, we definitely prefer the look and feel of a native App!
Web UI Tour
The devolo HCCU web UI is divided into seven sections, we'll take a tour around these now in detail to see what each part has to offer. As mentioned above you can take a proper tour using the devolo demo system if you wish!
Each section of the web UI is colour coordinated so that the "widgets" created in each are the same colour as the header icon. Just a nod to the devolo design team here as this makes the web UI much nicer to navigate and means you can instantly tell what type of widget you're looking at on the dashboard based on it's colour.
It's also worth mentioning that each time you access a new part of the web UI a helpful overlay is displayed with descriptive help comments and arrow pointers to show you where to start with that particular section, another plus for devolo in the user-friendliness ratings.
Dashboard
The first section of the devolo HCCU web UI is a main "Dashboard" where you can drag around the various widgets that represent both physical devices and "virtual" devices (more on these later). This is a good start for devolo as often a customisable dashboard is a missing feature in other Z-Wave controllers.
The Dashboard here has a nice today / tomorrow / day after tomorrow weather forecast display which is automatically generated from the location information that we entered when adding the HCCU to the devolo Cloud portal.
There's also a scrollable events / messages panel that updates each time a device does something - such as a socket turning on / off or a door sensor opening / closing.

Devices
The "Devices" section is where you (unsurprisingly) add and manage your devices. These are presented in a simple table format with a plus icon in the top right corner to allow you to add new devices.

Note that throughout the web UI there are a few German words that have obviously been missed during translation - it's no big deal but did leave us scratching our heads in some cases as we tried to work out what they meant. There's also occasional issues like using a comma instead of a decimal point in temperature and percentage readings, but overall the UI looks clean and well thought out. Hopefully these little niggles will be improved in a future update.
Clicking on the "statistics" icon will open a popup that displays any associated graph for the device, another great feature from devolo and something else that is often missing from other Z-Wave controllers, requiring custom coding or third-party plugins to achieve the functionality.

You can edit the device properties here too, including changing the device's name, allocating it to a particular location, choosing an icon or deciding whether to display it on the main Dashboard or not. The options are presented in a simple and clear fashion and the layout is consistent across all devices.
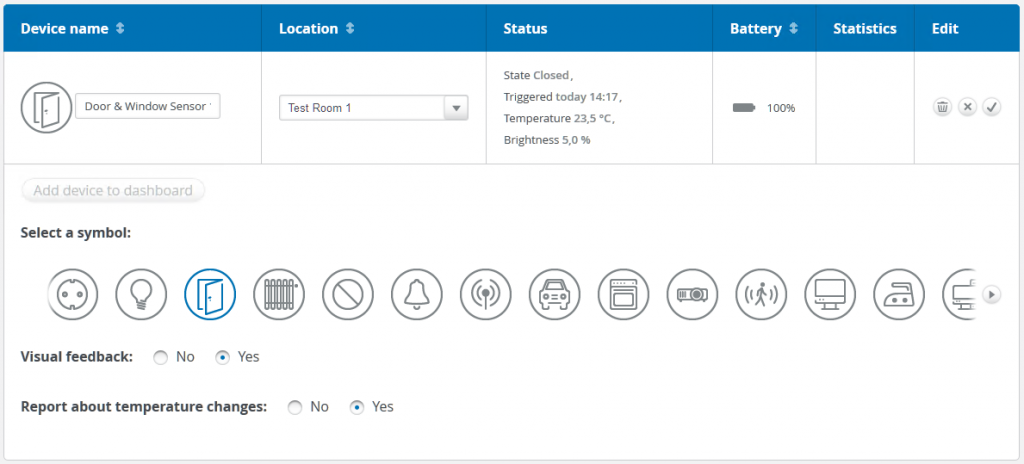
Device-specific options (sometimes referred to as "Z-Wave Parameters") are also shown where relevant and devolo has taken a novel approach here for all of their own devices - pretty much all of the complicated and confusing options are hidden, inaccessible and pre-configured so that each device operates in an optimal way.
Options that do require end-user configuration are listed with simple text and selectable choices - this is great for those new to Home Automation as it makes it nice and easy to configure the device. It also stops people messing with options that they don't fully understand that can have an adverse effect on how the device works!
Groups
"Groups" covers a couple of features, the first and not-so-interesting is the ability to set-up locations that allow you to group devices together. These don't really do anything useful, only really serving cosmetic purposes and are also a little bit limited because a device can't exist in more than one location at a time.

So you couldn't for example create locations for kitchen / dining room / living room and then another location for "ground floor" and have all the devices from the previously created rooms also present in the ground floor location. Hopefully this will be something that devolo can look at improving in the future.
More useful is the "smart groups" feature as this allows you to group together devices of the same type (for example sockets, sensors, TRVs) into one "virtual device" and add it to the Dashboard. This allows you to control all the devices with one single widget and they will all operate as one - create one for all your sockets and you can turn them all on / off simultaneously from just one widget.

OK, so that's not that impressive - but what makes the feature really shine is the little check-box in the "Synchronized" column - with a single click of your mouse this implements advanced logic to keep all the devices in sync, whether they are operated from the web UI or locally on the device itself.
Just think about that for a moment - group sockets together and when you switch one on via the local switch, all the others turn on too. Or perhaps you'd like to sync your Room Thermostat with your TRV so that when you change the set-point on the Room Thermostat it is automatically updated to the TRV?
How simple is that? Compared to other controllers which would need complicated Scenes, Logic or even LUA scripting to achieve the same result - nice one devolo!
Schedules
No Home Automation controller would be complete without a way to create schedules so that you can automate your devices according to date & time events. devolo definitely doesn't disappoint in this area and has implemented a really flexible schedule editor in the "Schedules" section.

By the way - see what we mean when we mentioned earlier about the colour coordination of each section? It really does help you to easily identify what type of "thing" you are dealing with when you are creating Schedules, Groups, Scenes, Rules, etc!
You can create multiple schedules using the graphical editor to add physical devices, Groups, Rules, Notifications and even other Schedules. It's very comprehensive and you can even switch into a graph-style editor if you prefer.
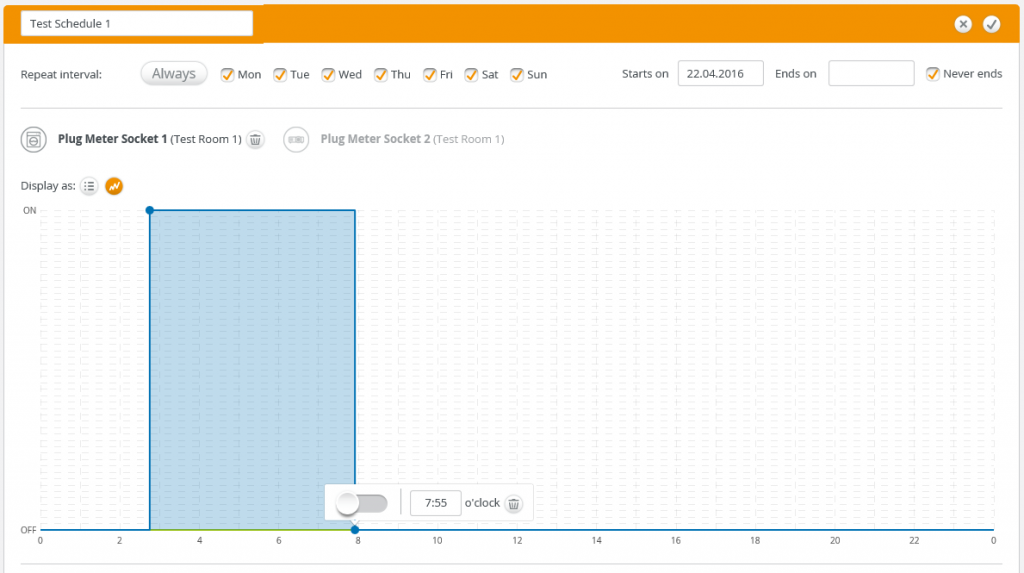
One surprising omission within the Schedules section is the lack of sun-rise and sun-set type events. These are quite common in other Z-Wave controllers so we hope that devolo add this functionality in the future. That said, you can achieve similar results using the devolo door & window sensor or motion sensor as both of these include brightness / light level - more on this later.
Scenes
The more we dug around under the hood of the devolo web UI the more stuff we found that we really liked. devolo have clearly put a lot of thought into how the features and functionality are presented. This next section is where you can create your "Scenes" to control multiple devices at the click of a button.

Strangely there's no option here to add a widget to the Dashboard for quick access to run a Scene directly, which is a shame as it means you have to dive into the Scenes section if you want to do that. We also couldn't find any way to add a simple delay to a Scene - so for example turn a socket on and then 30 seconds later turn another socket on. Hopefully both of these improvements can be added soon, we think they should be quick fixes for devolo to make.
What is impressive here though is that once again a simple drag-and-drop interface is used to create the Scene itself.

Note also that Scenes aren't just limited to physical devices - you can include Groups, Rules, Notifications, Schedules and even other Scenes. We've never seen this level of flexibility and ease-of-use in a Z-Wave controller before!
Notifications
Another nice touch from devolo is in the "Notifications" section where you can easily create SMS, Email and Push Notifications for your user account.

devolo provide you with 12 free SMS messages through their own gateway so that you can test Notifications, but after that you'll need to purchase some SMS credits to continue to use the devolo gateway. Unfortunately at this time they don't appear to offer an SMS package for the UK, but this should become available shortly.
In the meantime, you can actually add your own third party SMS gateway anyway - this is a great feature and not seen in other Z-Wave controllers such as Vera & Fibaro.
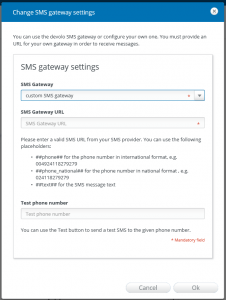
Email and Push Notifications work well as an alternative to SMS, so there's other options here if you don't want to or can't use another SMS provider.
We also like the fact that there's an automatically created system warning for "low batteries" and all battery powered devices get added here by default. Simply set the SMS, Email or Push user in the settings and they'll get notified whenever there's a battery that's getting towards the end of it's life.
devolo also let you add multiple users to the HCCU - the user simply needs to register for an account at the mydevolo.com web site and then you can invite them to share access to your Smart Home.

Once the user has been added, the events / messages panel on the Dashboard shows a log of anything that the user has done on the system.

If the user enters their SMS details and installs the devolo iOS or Android App they will also be able to receive those Notification types.

Rules
The heart of any Home Automation controller is it's ability to implement logic - carrying out your "If This Then That" requirements - and it's here that devolo has done an outstanding job!
A couple of default system Rules are already created to cover alarm sensors and smoke detectors and these are automatically populated with those device types so all you need to do is add your "That" to the Rule.

Within a few clicks we were able to create Rules that could Arm and Disarm our alarm system by clicking on buttons on the devolo keyfob device. The rule that we created simply enabled or disabled another Rule, the default alarm sensors one.

Once again you can see that devolo make use of an easy-to-use drag-and-drop interface to build the Rules, with the screen being divided in half with an "If" side and a "Then" side. What's really cool here is that pretty much any widget type can be used on either side - physical devices, Groups, Schedules, Notifications and even other Rules!
And did you spot that small drop-down control with "And (everything applies)" in it? Yes, that's correct, the devolo HCCU supports "AND" in it's logic, a key feature that is nearly always missing from competitor Z-Wave controllers.
Each time you drag a widget to either side you'll also be able to configure specific additional options depending on the type of widget being used.
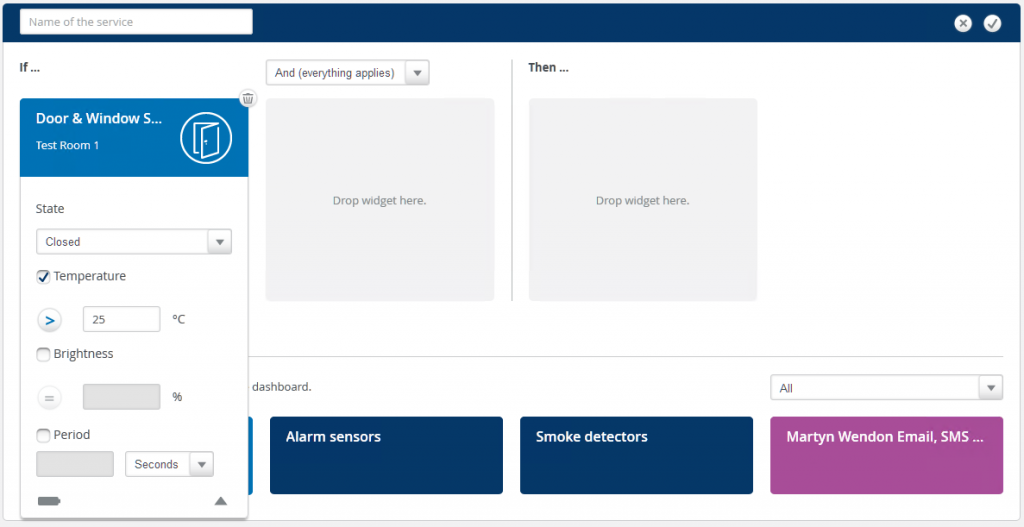
For example, when you drag a door / window contact sensor device to the If side, you can change the State to be opened or closed and the Temperature or Light Level to be equal to, greater than or less than a specific value. There's also a "period" check box where you can enter a number and select from seconds / minutes / hours - meaning that the If condition for that device has to exist for at least that amount of time before it becomes true.
Or if you drag a metering socket to the Then side, you can elect to turn it on or off and you'll get options to control how long that state change should last.
All in all it's really powerful stuff and we were able to easily create some pretty advanced automation logic with a handful of mouse clicks.
Adding Devices
Although we gave a brief overview of the Devices section above, we thought it made sense to cover this in depth as it's an area in other Z-Wave controllers that often leaves us infuriated!
To add a device in the devolo HCCU is simply a case of heading to the the Devices section and clicking on the plus icon in the top right. An "add devices" pop-up appeared on the screen, allowing us to select which devolo device we wanted to add. All eight of the devolo Z-Wave devices are covered here and a ninth icon is also present for "No devolo device" which covers non-devolo Z-Wave devices.
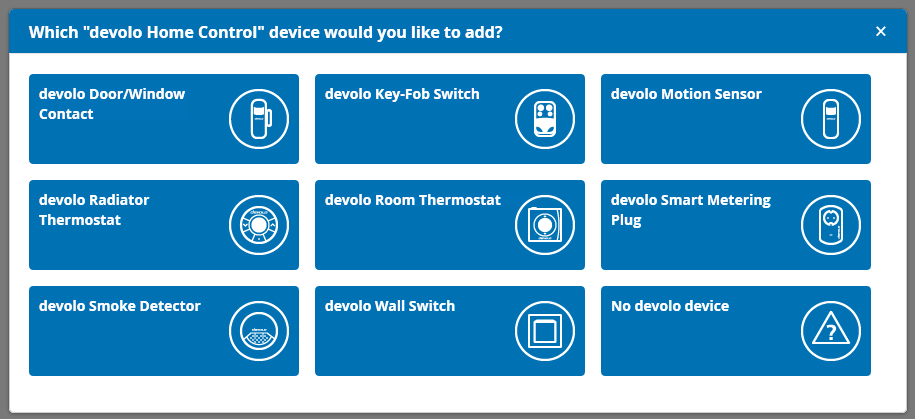
As we've mentioned several times now, it's really impressed us just how far devolo have taken the end-user experience and nowhere is this more evident than in the Wizards that lead you through adding devices.

Simply click on the device you wish to add and follow the steps shown - we can't stress enough how good each Wizard is, every step has highly detailed notes and explanations and there are even brief videos to show you exactly what to do for every device.

Within a few minutes the devolo HCCU will find your new device and configure it automatically.

And finally you can name the device, allocate it to a location and choose whether to display the device widget on the Dashboard or not.

You can even change the icon to something that suits the use of the device and if there are any additional options that might need changing they will be shown here too. We can't recall any other Z-Wave controller that has such an easy-to-use and informative process for adding devices!
devolo Devices
Now that we've covered the devolo HCCU web UI in detail we'll take a look at each devolo Z-Wave device in turn. There are a total of eight in the range currently and they cover most of the common areas that you'd want your Home Automation system to manage.
devolo Home Control Door / Window Contact
Based on the same hardware that is used in TKB, Philio or Zipato sensors, these are a neat little device and, something we'd never noticed previously, they have a reed switch on either side of the casing. This means that the magnet can be placed either side, allowing easier mounting of the sensor on doors and windows.
Once the device is added to the HCCU by simply following the Wizard, we could adjust the available options if required and add a widget to the Dashboard.

On the Dashboard the device is represented with a neat widget showing the current state and the time the state last changed. An icon for battery is also shown, along with an icon that expands the widget into a larger version that features the current temperature and brightness levels as well.

There's also a link for "Statistics" that shows graphs for all the different parts of the device.

We mentioned previously that devolo have really thought through exactly how you'd typically want to use each device and here you can see what Ifs are available for use in the Rules section for the door / window contact sensor.
devolo Home Control Motion Sensor
This is another device that's based on the same hardware that is used in TKB, Philio or Zipato sensors and once again it's a simple case of following the Wizard to add it to the HCCU, give it a name and configure any settings.

Over on the Dashboard a similar widget to the door / window contact sensor is created.

And graphs are automatically updated every time the device reports new data.

Finally we can see that the logic capabilities have also been well taken care of over in the Rules section.

devolo Home Control Key-Fob Switch
This time devolo have chosen to use the venerable keyfob hardware that's used by the likes of Z-Wave.me and POPP. These keyfobs have always been good devices and really flexible in how they can be configured and used, but they've historically been quite complicated to get working by end-users, so we were hoping for good things from the devolo implementation!
First up was to remove the battery tag, a simple case of removing the screws with an appropriately sized screwdriver so that we didn't mash the screws up getting them out. Following the Wizard once again and within a few minutes the device was added to the HCCU.
We were really pleased to see how devolo had chosen to present the keyfob, a simple drag-and-drop configuration that allows you to configure each button.

We're not sure what "Taste" is supposed to mean, but it's pretty obvious what you need to do - just drag whatever you want to control up to the appropriate button! And don't forget, this isn't limited to physical devices, you can control Groups, Schedules, Rules, Scenes and Notifications too.
Over on the Dashboard we also spotted another neat trick from devolo, you can also click on a virtual button on the widget to execute whatever underlying "thing" you've assigned to the physical button on the keyfob. Pretty cool!

And remember earlier where we said we'd been able to easily create Arm and Disarm rules using the keyfob? This literally took half a dozen mouse moves and clicks :-)

devolo Home Control Smart Metering Plug
Continuing with the theme of using pre-existing hardware, devolo have picked up the TKB / Philio Smart Metering Plug. The TKB variant of this device has always been a firm favourite at Vesternet so we weren't expecting any surprises with the functionality in the devolo version.

A simple widget on the Dashboard allows on / off control and shows the instant power consumption in Watts, expanding to show the total kWh used over time. Here you can see that we changed the icon to represent a projector - there's a good selection of icons included by default, it's also possible that devolo will allow users to upload their own custom icons in the future.

A graph showing the power consumption is also available, but nothing for kWh over time - we guess that this is because that figure will be constantly rising! But a total-per-day bar-graph would be a welcome addition.

Ever tried creating a Scene in a Vera or Fibaro controller that does something when power usage rises? Up until recently this was usually tricky and required convoluted LUA scripting, so it's nice to see that devolo have covered this right from the start as well.

devolo Home Control Wall Switch
With their wall switch devolo have taken the same route as with the keyfob, opting to use the same hardware as the Z-Wave.me and POPP versions.

We've always liked these devices as they've proven reliable and work well, but like the keyfob they can be complicated to configure. Not so with the devolo HCCU though!
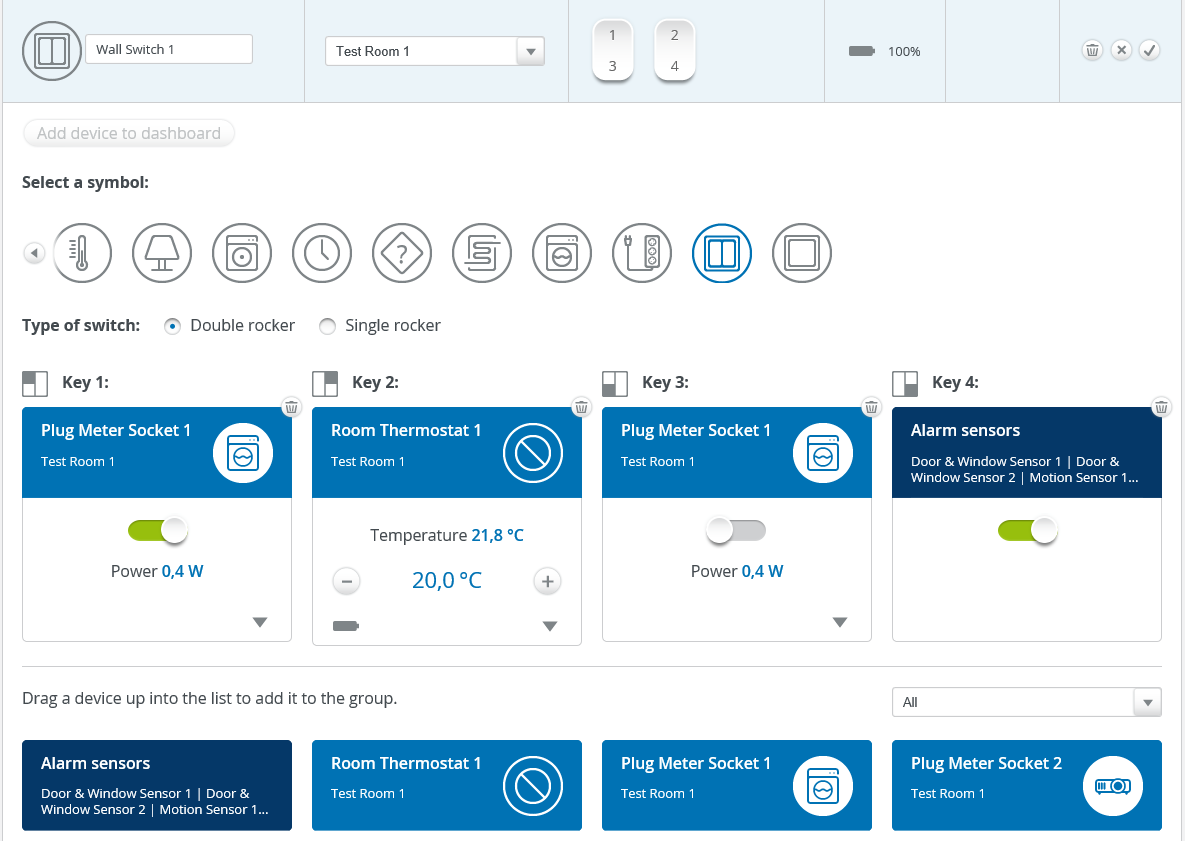
It's once again simply a case of dragging whatever you want to control to the appropriate slot - be it a physical device, Group, Schedule, Scene, Rule or Notification. Job done in a few seconds and devolo have used the same trick on the Dashboard that they use with the keyfob, you can click the switch icons on the widget as well.

And of course you can also use the wall switch directly in the Rules section too.

devolo Home Control Smoke Detector
By using the same hardware as POPP & Vision for their smoke detector, devolo have chosen another solid, reliable device as a base.

Once added to the HCCU it shows on the Dashboard with a simple widget that displays the state and battery status.

A graph can also be seen by clicking on the statistics icon and this shows activations of the alarm, not particularly useful but just another example of consistency across the HCCU web UI.
Using the smoke detector in Rules is easy too, just drag it into the If side and add something to the Then side. We set our Rule to send a Notification in just a few clicks of our mouse.

We tested the smoke detector by pressing the self-test button on the top for a few seconds and the siren sounded as you'd expect. Interestingly though our Rule also fired and we noticed that the widget on the Dashboard changed to show the smoke detector in an alert state. When we've tested smoke detectors in other controllers we've found that the self-test is hardly ever seen by the controller, so kudos to devolo for getting this to work as well!
devolo Home Control Radiator Thermostat
The Danfoss TRV is another Vesternet favourite, being a simple device there's not much to go wrong on the controller side so it's strange how some Z-Wave controllers seem to have issues with supporting it properly.
Thankfully the devolo HCCU has no such problems with their version.

Once we'd followed the Wizard we could control the radiator thermostat from the Dashboard using a widget with plus and minus buttons or a slider to change the set-point.

Being a battery powered device it will spend the majority of it's time asleep so the set-point won't get sent immediately, instead the HCCU will wait for the radiator thermostat to "wake up". There's no way to change the wake up period from the HCCU, but this is set to a low level of 5 minutes anyway.
Within half an hour or so a graph was also available to track the set-point changes over time.

Setting a Schedule for the radiator thermostat was easy - just drag the TRV widget into a Schedule, enter the set-point and time and that's it.

Other Z-Wave controllers seem to make it so difficult to implement this sort of heating control so we were pleased to see that it's so simple here!
devolo Home Control Room Thermostat
In it's Danfoss guise this device has always had a bit of a chequered history. The last time that we tested it we couldn't get it to work well in any of the mainstream Z-Wave controllers, so we were keen to see what devolo had managed to do with it.

Straight after we'd added the device to the HCCU we realised that this is yet another case where devolo have really got to grips with the functionality offered and made sure they implemented it correctly. Yes, that's right, you can even use the little button on the top of the room thermostat to do something - perhaps control another physical device, or run a Scene, or turn a Group of devices on, the possibilities are endless.
Over on the Dashboard we found a similar widget to the radiator thermostat, but this time the room temperature was also shown.
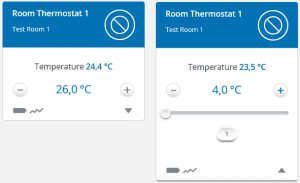
From the widget you can also run whatever "thing" you've attached to the physical button that we mentioned above and the associated graph features the room temperature as well as the set-point.

Where the room thermostat really shines though is when it's used together with the radiator thermostat in a Group.

By simply grouping these two devices together and ticking the "Synchronized" box you can create a simple heating zone. Change the set-point locally on the room thermostat and within a short time the radiator thermostat will be updated to match.
Create a Schedule to change the set-point on the room thermostat to suit your needs and with just a few mouse moves and clicks you've bought intelligence to your heating!
Does the devolo HCCU play well with others?
Well it's Z-Wave right, so everything works together out-of-the-box, doesn't it :-)
OK, back in the real world, we thought it was prudent to test the devolo HCCU with a few other common devices and we were pleased to see that "simple" devices like sockets, dimmers and relays all worked fine. Note that we didn't carry out any extensive testing since that wasn't the purpose of this review, but from what we saw it's certainly possible to use non-devolo devices with the system as well.
Conclusion
As you will no doubt realise by now, we really like the devolo Home Control system! It's rare for a manufacturer that is new to the Z-Wave market to get so much right in their first attempt and devolo have hit the mark in most areas.
Sure, there's a few minor niggles and a couple of missing bits of functionality, but we think that these should be pretty simple to rectify.
For somebody looking to buy their first Z-Wave system or for a newcomer to Home Automation in general, it's incredibly important to have a good initial experience and not be left staring at a box of bits and a complicated system that will take them hours of searching on Google to get to grips with.
With the devolo Home Control system you'll be up and running in a matter of minutes and ready to add your devices. The attention to detail means that the web UI is simple to use and there are more than enough features to get your Smart Home under control quickly and easily.
We hope that you enjoyed reading this in-depth review and we hope that we've done devolo justice in presenting a balanced view of their entry into the Home Automation market. We look forward to more from devolo in the future as we're convinced with a few tweaks here and there the system will become a formidable competitor to the likes of Vera & Fibaro!
Win an Xbox One!
As part of a launch promotion we've teamed up with devolo to offer a prize-draw for a Microsoft Xbox One.
Simply buy the devolo Home Control Starter Pack before the end of May 2016 and you'll automatically be entered into a prize-draw for the Xbox One.
A winner will be selected at random during June 2016 and notified accordingly.
Good Luck!
Martyn


